Showing posts with label JavaFx. Show all posts

Thursday, August 13, 2015

Java Serializable Objects Usage

In order to break down Class object into bytes steam, Java.Io.Serializable is used. Whenever you want to send data over network, make sure to check if your class is implementing Serializable or not. Some points to remember to get rid of Serializable related errors.

  • If there is any inner class, it must be declared Serializable.
  • If there is any member variable of class which you don't want to send (or make serializable), declare it TRANSIENT.
  • If there is any arraylist declard e.g. Obseravable List from FX Collections, then remember that this type of list is not serializable and it will create errors. Use Simple Array List instead of FX Collections Observable List.


Example :

public class Patent implements java.io.Serializable 
{
   public String name;
   public String address;
   public transient int CNIC;
   public int number;

}

Friday, August 7, 2015

JavaFx - Validating Numeric Only Text Field

Earlier, I posted about validating IP in a Text Field. Thought of sharing information about Numeric Only validation too. So, its pretty simple. Here are some lines of codes

1. @FXML
    private TextField port;

2.  if (!validatePort(port.getText())) {
                showDialog("Invalid Port");
            }

3.  public boolean validatePort(final String port) {
        Pattern pattern;
        Matcher matcher;
        String PORT_PATTERN
                = "^([0-9]+)$";
        pattern = Pattern.compile(PORT_PATTERN);
        matcher = pattern.matcher(port);
        return matcher.matches();
    }

JavaFx - Validating Text Field with IP

Recently, I happen to come across IP validation problem in JavaFX code. So, I googled and googled. In the end, I found the relevant information. Here are some lines of codes, which is useful. Use it when you need it.

1. @FXML
    private TextField ip;

2.  if (!validateIP(ip.getText())) {
                showDialog("Invalid IP Address");
            }

3.  public boolean validateIP(final String ip) {
        Pattern pattern;
        Matcher matcher;
        String IPADDRESS_PATTERN
                = "^([01]?\\d\\d?|2[0-4]\\d|25[0-5])\\."
                + "([01]?\\d\\d?|2[0-4]\\d|25[0-5])\\."
                + "([01]?\\d\\d?|2[0-4]\\d|25[0-5])\\."
                + "([01]?\\d\\d?|2[0-4]\\d|25[0-5])$";
        pattern = Pattern.compile(IPADDRESS_PATTERN);
        matcher = pattern.matcher(ip);
        return matcher.matches();
    }

Saturday, February 22, 2014

[Solved] Signer Cetificate Warning

If you find out warnings related to Signer Certificate that will expire in 6 months and you get worried. Worry not!! Here is what you should do to dust it off!


Right-click project and go to Properties


Uncheck 'Request Unrestricted Access' and Press OK!


[Solved] Error: Controller is not defined on root component

If you happen to come across this error in you FXML file and you find out that you did mentioned fx:controller tag in your FXML file and its RED underline, then it means that your Netbeans needs update.

When you install Netbeans initally, it will show you some updates after connecting to internet. If you somehow ignore them or failed to update then these errors will show up. Remember that these errors will only show up when you save the project using Scene Builder. Scene Builder has latest update of JavaFx package than Netbeans. Upon updation, both will have same versions.

Here is the code that you will find in FXML file using Netbeans IDE :

...xmlns:fx="http://javafx.com/fxml" fx:controller="netbeansjavafxtest.FXMLDocumentController">

whereas after saving the file using Scene Builder, the above line will change to :

...xmlns:fx="http://javafx.com/fxml/1" xmlns="http://javafx.com/javafx/2.2"

fx:controller="netbeansjavafxtest.FXMLDocumentController">

After updating the Netbeans, there will be no more Red Underlines on the above code. Updating Netbeans is quite simple.Easy Peasy!

JavaFx Beginners Tutorial - Scene Builder + Netbeans

When I was tasked to start work on JavaFx using Scene Builder & Netbeans, I shivered. Because, both were unknown to me then. Google helped but I have come to a point that most of the tutorials were not meant for beginners (they were labelled but they were not in true sense). So, I decided to make a pictorial post of it. Here I start...

Pre-requisites: JRE , Netbeans & Scene Builder installed.

1. Start Netbeans and Open New Project


2. Select JavaFx FXML application , Enter project name (we are using NetbeansJavaFxTest here) and location details & Project is made.


3. Check FXML(Flexible XML) file which is created automatically by Netbeans. If you have Scene Builder installed, double-clicking the FXML file will open Scene Builder but right-clicking and clicking EDIT will open FXML page in Netbeans.


If you double-click the file but Scene Builder doesn't open up, check the integration in Net beans by going into Tools -> Options


4. Run Program by clicking Build and then PLAY button. Output window will appear of the above created project.

Clicking on Button 'Click Me!' will result in showing Text 'Hello World' on screen and 'You Clicked Me!' on output screen in Netbeans IDE.


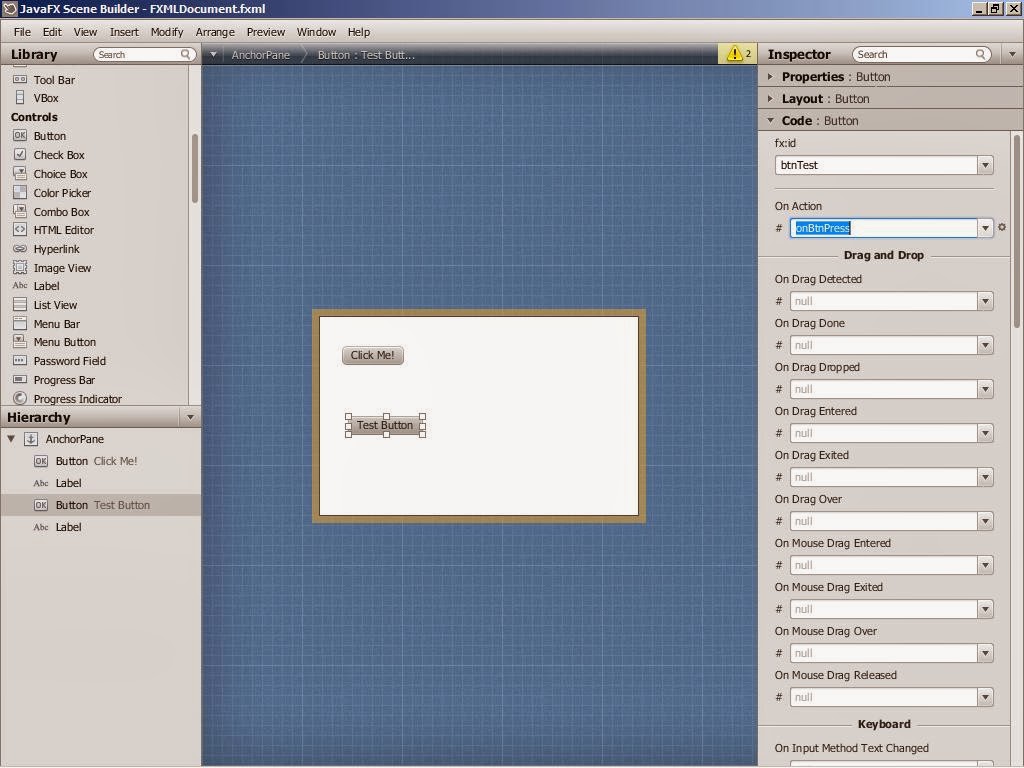
5. Now, its time to start Scene Builder and add some buttons of our own. Here is how Scene Builder Looks like (Remember we went there by double-clicking the FXML file)

6. Add Button and Label from Controls section by Drag and Drop. When you add them to the project, check that they also get listed in Hierarchy pane. Correspondingly, each control has properties which you can change. We will label the button etc as desired.


7. Now give Name & Event association to the control by going into Code section of Properties pane. Here we write 'onbtnPress' event as desired by us. (You can associate already created events but that will be explained later)


8. Check that Yellow warnings appear at the top. Here they mean that the identities and events given to controls are not part of controller (main Class having the events code)


9. Just to check what changes you can expect in Controller class after doing these changes in Scene Builder, you can click on Sample Skeleton and see the @FXML labels, events and methods. Remember, that its just a sample and not the exact code written in background right now.


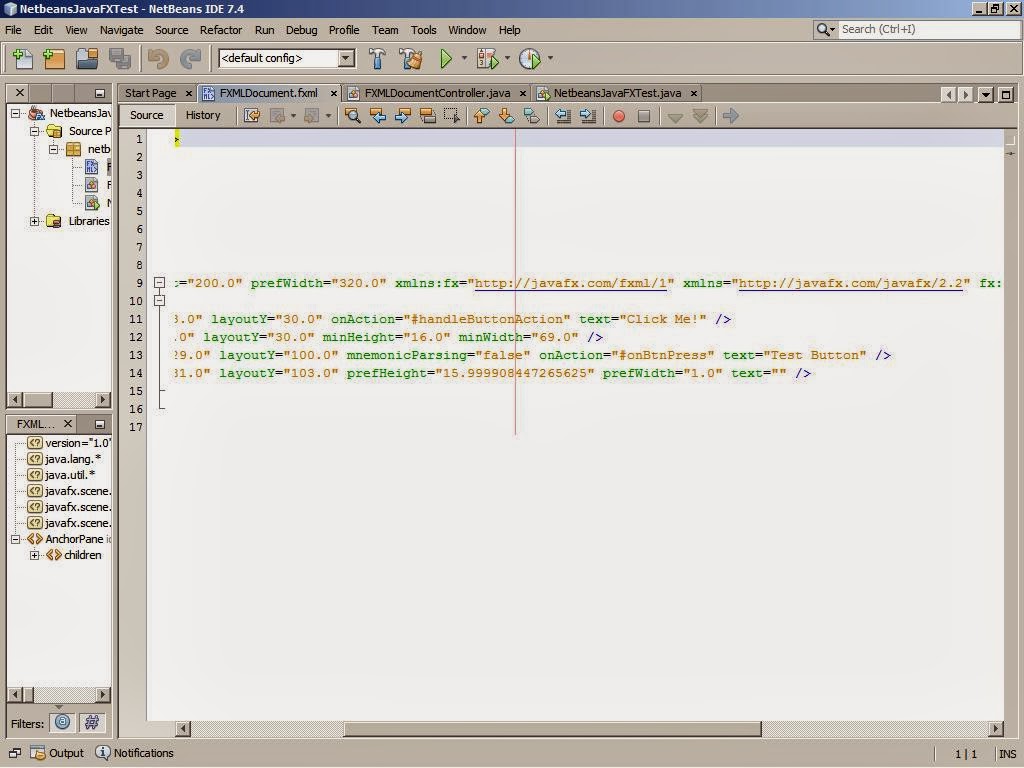
10. Click Save and FXML file is saved. Go to Netbeans and check the FXML file (Edit) and you will find new tags and events added to it. But since they are not mentioned in Controller class so, they will give Error.


11. Here is the magic trick. Right-click FXML file and click on Make Controller. It will add up all the events etc that you made in Scene Builder earlier. If you check the FXML file, it will be having no more Errors after you do the above steps and build it.


12. Now, add the code to the events that you have created (onbtnPress in our case). We will just add Text to the label which was earlier created. Build the program Run it & you will get the output as desired.


That's all for the beginners. Now you know how to make changes to scene builder which gets reflected in Netbeans and how you add them back. For any queries, keep commenting!